| First Steps in Programming RISC OS Computers |
|
| Martyn Fox |
Chapter 10 : Improving the screen display
This section deals with ways of using the whole screen to improve the appearance of programs. If you type in some of the examples, you won't be able to follow the guide on the screen while you do so, so you may wish to write them down first.
Let's return to our program for working out the day of the week of any date. Although it does what it's supposed to, the screen display is rather boring. It's just white text on a black background, the text just scrolls up a command window and, if we try several dates, our previous attempts remain on the screen, which is a bit untidy!
Take a look at a new version of the program called Days4 which improves matters. It makes some use of colour and the text is put nearer the middle of the screen, which is cleared each time you enter a new date.
Improving the Display Colours
The mode change in line 30 sets the foreground colour to white and the background colour to black. Our first task after this is to change the background colour to make the display look more attractive.If you refer back to the list of colour numbers in Section 6, you will see that blue is colour 4. To make the background this colour, we use the COLOUR command with 128 added to the colour number. We could show it as 132, but leaving it as '128+4' in line 50 helps us understand the workings of the program when we refer back to it. It takes a tiny amount of time for Basic to work out what '128+4' means, so it's not a good idea to do this inside a loop which has to repeat itself as fast as possible, but it doesn't matter here as this part of the program is only run once.
Line 110 clears the screen. The first time we get to this line, of course, the screen is already clear as we've just changed mode. The purpose of this operation is to clear the screen again each time our program goes round its main loop.
The text cursor will normally be in the top left-hand corner of the screen after a mode change or CLS command. When you print something on the screen, the line of characters usually starts on the left-hand side and, when you press Return, the cursor returns to the left-hand edge on the line below.
Keeping TABs on Text
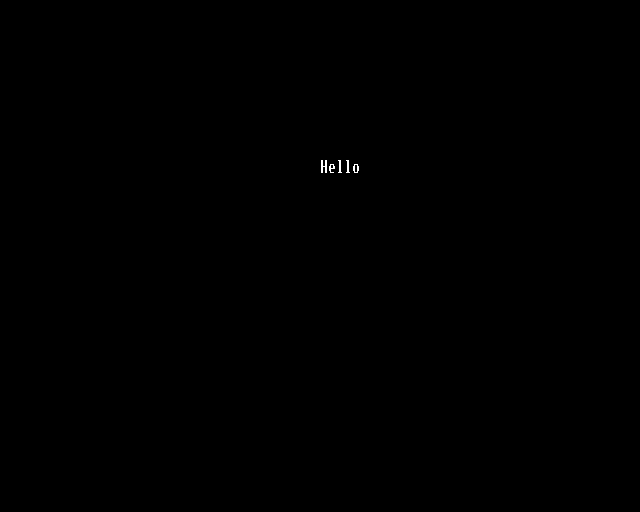
We can print text wherever we like on the screen by using the TAB keyword. This is followed by either one or two numbers in brackets and has the effect of moving the cursor to the column and row referred to by the numbers. If, for example, we type:
PRINT TAB(40) "Hello"
this will print 'Hello' on the next line, but 40 character positions in from the left. If you're using an 80 column mode, such as mode 12 or mode 27, this will place the beginning of the word halfway across the screen.
If you type:
PRINT TAB (40,10) "Hello"
the word 'Hello' will appear 40 columns in from the left and 10 rows down from the top. In mode 27, which has 60 rows, this would place it about one sixth of the way down the screen. Mode 12 has 32 rows, so it will be about one third of the way down.
We can use TAB with the INPUT command, as this also involves printing on the screen, and this is how we first encounter it in lines 120, 130 and 140. The first message is printed starting 15 positions across and 10 rows down (column 0 is the left-hand side of the screen and row 0 is the top row). The date number appears as we type it in at the end of this line, then the next line is printed one line below and the third one line below that, each starting 15 columns in.
Improving the Error Message
Line 340 now contains an improved way of handling the error message that we would print if a year was entered outside the range of the program. Because this line is long, we'll start it 10 columns in instead of 15.Because we're going to blank out the screen when the user has another go at entering the date, we must allow them a chance to read the message first; hence the line 'Press any key to continue'. This line is printed two lines below the preceding one to improve the appearance of the program.
The expression 'REPEAT UNTIL GET' is a way of getting the program to wait until we press a key. Basic gets the value of GET by waiting for you to press a key and reading its ASCII code. Provided this is not zero (which it will only be if you type Ctrl@), this mini-loop will only be executed once and the program will continue as soon as you press a key. The program will continue after the error handler, starting the main loop again, and the first thing it will do is clear the screen.
The effect of the semi-colon after 'Press any key to continue' is to prevent the cursor going back to the beginning of the next line. It looks a little better if it's flashing away at the right-hand end of the last line on the screen.
When you sort out the screen layout of your own programs, remember to check what happens when an error message of this sort is printed. It's very easy to produce a beautiful-looking program which suddenly looks scruffy when somebody presses a wrong key!
Returning to the main program, line 230 introduces a small variation in colour so that the first part of line 240 is printed in yellow. We've split the printing in this line so that we can change the colour back to white before we print the name of the day. This will make it stand out more. Again, note the semi-colon after 'That day was a', which prevents the cursor going back to the beginning of the next line.
We've now put our text in the middle of the screen, but this means the surrounding area is blank. Our program might look more attractive if we could put some sort of pattern round it.
Text and Graphics Windows
Unfortunately, the more complicated the pattern, the longer it would take the machine to redraw it when we clear the screen each time we go round the loop. It would be very convenient if we could just clear the middle bit where we print the text, leaving the surrounding part untouched.We can actually do this by changing the size of the text window. The screen contains both a text and a graphics window. When you change screen mode, these are both set so that they occupy the whole screen, but you can change the size of either of them, using VDU commands.
Text and graphics windows should not be confused with the Wimp windows (the ones with scroll bars etc.) that the desktop uses. Some Acorn documentation at one time referred to text and graphics windows as viewports.
When you print text on the screen, it behaves as though the screen is the size of the text window. The numbers following the TAB keyword refer to the position of the text relative to the top left-hand corner of the window and the CLS command clears just the window, leaving the rest of the screen untouched.
Let's see how we can make use of the text window with yet another version of our 'days' program. In order to make it look good in either mode 27 or mode 12, there are two versions of the program among the files, called Days5_12 and Days5_27. The only differences between them are the mode they select and the vertical TAB values.
Setting the Text Window
We've changed the beginning of the program somewhat. Line 60 sets the background colour to cyan and line 70 clears the screen to turn it this colour. The business of putting something round the edge of the screen is dealt with by the procedure PROCsurround. You can experiment with various shapes round the screen if you like by rewriting this procedure. As it stands, it simply prints the words 'Two Century Calendar' spaced out in red at the top of the screen, above where our text window is going to be set, then changes the foreground colour back to white ready for printing the text in the main loop.Having drawn or printed the surroundings, we can now set our text window. This is done by sending ASCII code 28 to the screen, using the VDU command, followed by four other numbers which refer to the positions of the sides of the text window, in terms of columns and rows. This command takes the form:
VDU 28,l,b,r,t
The second and third numbers, l and b, refer to the position of the bottom left-hand corner of the window; l is the number of columns in from the left and b is the number of rows down from the top. The other two numbers, r and t, give the position of the top right-hand corner, again r being columns from the left and t rows from the top.
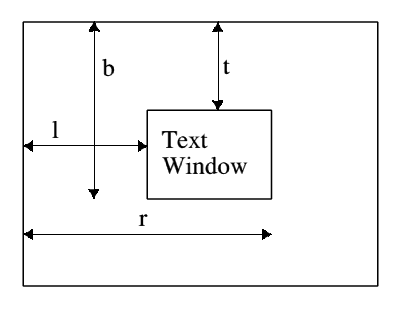
In line 90 then, we send number 28 to the screen to tell it that the four numbers that follow are the text window coordinates. The left-hand side is 10 columns in, which is 1/8 of the way across, as we're in an 80-column mode. The bottom, in mode 27, is 50 rows down, leaving 10 rows underneath, as there are 60 rows on the screen and in mode 12 is 27 rows down, leaving 5 rows underneath, as there are 32 rows on the screen. The right-hand edge is 70 columns from the left and the top edge is either 10 or 5 rows down from the top of the screen.
Having set our window, we can change the background colour to blue, and the text window will turn this colour when we clear the screen at the start of the main loop. This means we will actually have two background colours on the screen at the same time. The window was cleared to cyan when it occupied the whole screen and cleared again, to blue, after it had been reduced in size.
The rest of the program works in the same way as last time, except that we've changed the numbers after the TAB keywords to make the text fit nicely in the window, remembering that they now refer to the number of columns in and rows down from the top left-hand corner of the text window, not the screen.
If you run the program from the Basic command line, rather than the desktop, LIST the program after RUNning it. The listing will fill the text window and scroll upwards. Notice though that only the text window scrolls - the surrounding area, with the words along the top, or any graphics you may have drawn, stays where it is.
This is a very useful feature of text windows. You can have a picture on the screen with a small area of text, within a text window. If you want to let more text appear, it can be kept within its own small area without scrolling the whole screen.
The Graphics Window
Now we've found out about text windows, let's have a look at graphics windows. The text window is the area on the screen where we can put our text, so there are no prizes for guessing that the graphics window is the area where we can draw pictures!Try this experiment. Enter Basic, select mode 27 or 12 and type:
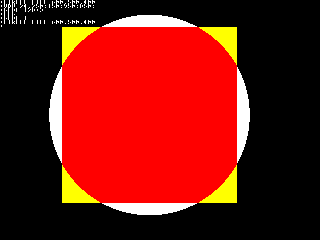
CIRCLE FILL 600,500,400
You should have a big white circle, more or less in the centre of the screen.
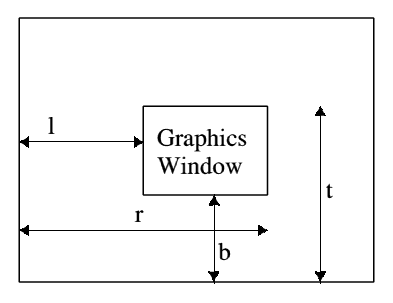
Now we'll set a graphics window. The command for this is similar to the one for the text window and takes this form:
VDU 24,l;b;r;t;
The meanings of l, b, r and t are similar to those for a text window, except that b and t are measured up from the bottom of the screen, not down from the top.
Be particularly careful to type semi-colons rather than commas after most of the numbers (we'll find out why later) and don't forget the semi-colon after the last number:
VDU 24,250;150;950;850;

GCOL 1

CIRCLE FILL 600,500,400
This is exactly the same CIRCLE FILL command as before, so you might think it would draw a red circle to cover up the white one precisely. You'll see, however, that only part of the circle has been redrawn in red - the sides, top and bottom of the original white circle have been left untouched. If you now type:
GCOL 128+3

CLG
a yellow rectangle will appear. This is the new size of your graphics window, which we've just cleared to a yellow background. CLG, by the way, means CLear Graphics.
Clearing the graphics window made the red circle disappear but you can, of course, put it back by repeating the CIRCLE FILL command, to produce an interesting shape.
We set a text window with VDU 28, followed by four numbers indicating the positions of its edges in terms of columns and rows of text. The command to set the graphics window is similar, beginning with VDU 24, but the numbers which follow are graphics coordinates, and the vertical positions are measured up from the graphics origin at the bottom of the screen, rather than down from the top, as in the case of the text window.
There is a problem here. The VDU system which receives numbers sent to the screen only works with 8-bit numbers, that is numbers between 0 and 255. If you try to send it a number greater than 255, it will ignore all the bits above the first eight, rather as though you had sent the number MOD 256. You can show this by typing VDU 263 and the machine will beep at you, as if you had typed VDU 7. If you subtract 256 from 263, of course, you get 7.
This doesn't matter when you're setting a text window as none of the numbers for rows and columns will be anything like as large as 255. Graphics coordinates, on the other hand, can involve numbers over 1000. For this reason, each coordinate number has to be sent as two separate bytes - the first one is the number MOD 256 and the second the number DIV 256. It is as if the number has 16 bits and we send the lowest eight first, followed by the highest eight.
Two-byte VDU Numbers
We could split each of our coordinates into two numbers in this way and type VDU 24, followed by eight numbers, but we don't have to because Basic is kind to us and works it out for us. All we have to do is put a semi-colon after the number and it sends it to the VDU as two bytes. We don't put one after the 24, because that is a one-byte number. All the other numbers must have one, even if they're less than 256, because the VDU expects two numbers for each coordinate, making a total of nine for the whole command. This is also why we have to put a semi-colon after the last number.You can see the effect of the semicolon by typing:
VDU 16961
This will print a letter 'A' on the screen. If you type:
VDU 16961;
you should get 'AB'. To find out why this is, type:
PRINT ~16961
which will print the number in hexadecimal form and show you that it's &4241. The lower byte is the ASCII code for 'A' and the higher byte the code for 'B'. If you send the number to the VDU without a semi-colon on the end of it, only the lower byte is acted on, resulting in an 'A' being printed, but adding the semi-colon means that both bytes are sent, one after the other, and you get both letters.
The Effect of the Graphics Window
Changing the size of the text window affects the position of text on the screen (though it doesn't move any text already there), as the TAB keyword counts columns and rows from the top left-hand corner of the window. The size of the graphics window, however, doesn't affect the positions of graphics, as these are relative to the graphics origin, which is normally in the bottom left-hand corner of the screen. Instead it determines what is drawn and what isn't. Graphics can only be drawn inside the graphics window and anything you try to draw outside will be invisible.You can show this by typing MODE 27 (or MODE 12) to reset everything, then typing:
DRAW 1280,960
You will get a white line from the bottom left-hand corner to the top right. The graphics cursor was set to the bottom left when you changed mode and the command drew a line from there to (1280,960).
Now type the MODE command again to both clear the screen and set the graphics cursor back to the bottom left, then alter the graphics window with:
VDU 24,300;200;900;800;
If you now enter the command to draw the line exactly as before, you'll find that only part of it is drawn, in the middle of the screen. This is because the ends lie outside the graphics window, and so were not drawn.
We'll just do one last experiment before we leave this subject. Don't disturb the setup of the graphics window, but type:
MOVE 600,500

VDU 5
The first command moves the graphics cursor to the middle of the screen, halfway along the visible part of the line, The result of the second command is that text is no longer printed at the text cursor, but at the graphics cursor instead, so the Basic prompt reappears in the middle of the screen.
Try typing in a line of text. You'll find it will become invisible when it reaches the edge of the graphics window.
You can return text printing to the text cursor either by changing screen mode or by typing VDU 4, and you can reset text and graphics windows so that they cover the whole screen with VDU 26.
Graphics windows are also referred to as clipping windows and are the key to how Wimp windows used by the desktop work. When you have mastered the basic techniques in this guide, you may wish to move on to using Windows, Icons, Menus and Pointers, as described in A Beginner's Guide to Wimp Programming.