
Logging
The Logging section provides control over a number of different aspects of the systems logging behaviour. This is most useful for tracking the boot sequence and system errors; and the resulting a text file can be sent via email to anybody offering help or assistance with a problem.
Clicking the Logging icon opens this window.
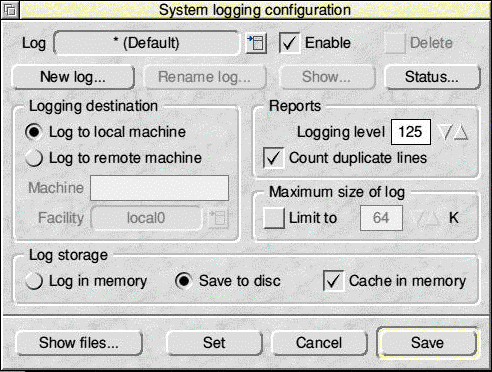
The Logging window is one of the few within RISC OS 4.39 that is relatively self-contained, in that each aspect of the feature is controllable from within the one window. We'll deal with this by working our way from the top of the window down.
Clicking in the menu field next to Log opens a drop-down menu allowing you to view the logs currently available on the system. You can switch between log files by selecting the one you wish to use from the menu.
If the Enabled field is ticked it means that that particular log is active. Deactivating a log will disable logging to that log, but will not affect any other system settings.
The Delete field, when selected, will delete the configuration from the system (and hence disable future logging to that file) but will leave the file in tact on your hard disc.
The New Log button allows you to create a new log based upon the default settings. Clicking the New Log button opens this window.
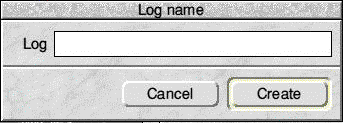
Enter a name into the space provided then click Create to close the window. If you change your mind click Cancel and the window closes without any further action.
The Rename Log button opens this window.
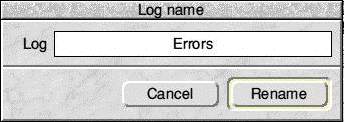
To rename the current log change the name within the Log window and click Rename. If you change your mind click Cancel and the window closes without any further action.
Show displays the log entries for the current log in a new window; if nothing happens when the button is clicked this means that there is nothing to display.
The Status button opens an Edit window displaying status information about the current log. If you click with Adjust, details are provided on all currently active logs. If no window appears, the log has not yet been defined and you should first click Set or Save.
The Logging Destination section determines whether logging information should be stored locally or sent to another machine, whether on a local network or an FTP site. Select Log to local machine to store the log locally. If you're sharing the file with a UNIX-based server, select Log to remote machinethen the appropriate facility from the drop-down menu. The facility setting tells the server where to place the file.
The Reports section determines the amount of information provided in a log, and whether duplicate files should be counted or listed individually.
The Maximum Size of Log setting determines whether logs should be allowed to grow to any size, or whether an upper memory limit should be put into place.
Finally, the Log storage options determine whether logs should be held in memory or saved to disc, and whether a disc cache should be used in the latter case. With a disc cache enabled the disc write process is that little bit quicker, which can make all the difference on a busy machine.
At the bottom of the window are four buttons.
- Show Files opens a directory display showing the log files stored on disc. These can be deleted if you do not require them. Note that if you delete a log from the settings window you can also remove the files from the disc, as they will no longer be updated by the configuration utility.
- Set allows you to apply the current selection. With Select you can apply it to the log file displayed in the window, while Adjust applies appropriate settings to all log files known to the SysLog setup.
- Cancel performs two functions. If you click it with Select you can close the window without configuring the selections. With Adjust you can reset the selections to the displayed log to their previous settings.
- Save allows you to accept the settings for all log files and save them to disc. If you click on it with Select the window is then closed; with Adjust the window stays open.
If you click with Menu above the System Logging Configuration a menu opens with a sub-menu Re-Scan Logs. The window looks like this:
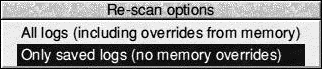
Whichever option you select the log files are re-scanned into memory. Any changes you make but have not saved may be lost in the process.

