| Beginner's Guide to WIMP Programming |
|
| Martyn Fox |
16: Saving – It's a Drag
Before we can save, we need a Save box! You will remember how we were able to use the Info box from another application in order to avoid having to create our own from scratch. There is no reason why we shouldn't get our Save box in exactly the same way.
So, load a Templates file from another program that you know to have a suitable Save box into WinEd, and copy it into our own Templates file, just as was done with the Info window in Section 8. The Save box will probably have the identifier 'xfer_send', so we'll continue to use that name.
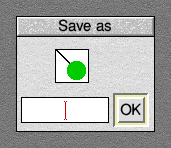
You may not find it easy to recognise this as a Save box; it might not have a sprite in the middle of it, but rather the word 'icn' instead. Note, though, that it has the title 'Save as'. In fact, Save boxes can take a variety of forms, but for the moment we are interested in the simplest standard form: the kind with a file icon to drag, a writable icon for the filename and an OK button. Try to find a pre-defined Save box of this sort to copy.
The file icon for dragging, which may currently be a text icon labelled 'icn', should be changed into a simple sprite icon (not indirected and not involving text) with a sprite name of 'file_012'. Ensure that this icon has a button type of 'Click/Drag', as we need to drag it to save our data.
The 'OK' icon should be icon zero. If you want this to look flat and 2D, like the OK button in the Options window, set it up with a border, a cream background and a 'Menu' button type. This button type means that it will be inverted (i.e. it turns black with cream text), when the mouse pointer is over it. You may prefer, though, to use a more modern 'slabbed 3D' icon (about which more in Section 20), whose background changes colour when you click on it, in which case it will need a pale grey background, an indirect validation string of "R6,3" and a different button type (either 'Click' or 'Release'). In both cases, though, a click on the icon notifies your application through Wimp_Poll.
The filename icon is icon 2 and should, of course, have a 'Writable' button type, and indirected text. It's not necessary to put any text in it, but the size of its buffer should be large enough to accommodate a filename, complete with its full pathname: let's give it the maximum of 256 bytes to allow it to cope with long pathnames. Ensure that its validation string contains:
a~
The 'A' or 'a' command in a validation string controls which characters may be typed into a writable icon. This command with the suffix '~' means that you can type any character but no spaces. If you want to make the pointer turn into an 'I' shape when it passes over the icon to indicate that its text is editable, which is normal for such icons, then the validation string needs another command:
a~;Pptr_write
The 'P' or 'p' command only works on RISC OS 3 or later, and sets the pointer to the specified shape when it's over the icon. The 'ptr_write' sprite is present in the Wimp pool, and RISC OS 4 and 5 have added other common pointers such as 'ptr_menu', which is used with pop-up menu icons adjacent to display fields.
The icons should be numbered as follows: the OK button should be icon 0, the draggable filetype icon should be icon 1 and the filename entry icon should be icon 2. Renumber your icons to match these if necessary, and, if there are any other icons in the Save box, delete them as they are not needed. When you have finished, resave your Templates file.
We now have four windows in our application! Naturally, we need a few more lines in PROCload_templates to load and create our latest one:
 1260 DEFPROCload_templates
 1270 REM opens window template file, loads and creates window
 1280 SYS "Wimp_OpenTemplate",,"<Shapes$Dir>.Templates"
 1290 REM ****** load and create Info box ******
 1300 SYS "Wimp_LoadTemplate",,stack%,ws%,wsend%,-1,"progInfo",0 TO ,,ws%
 1310 $stack%!(88+32*0+20)=version$
 1320 SYS "Wimp_CreateWindow",,stack% TO info%
 1330 REM ****** load and create main window ******
 1340 SYS "Wimp_LoadTemplate",,stack%,ws%,wsend%,-1,"Main",0 TO ,,ws%
 1350 SYS "Wimp_CreateWindow",,stack% TO main%
 1360 REM ****** load and create Options dialogue box ******
 1370 SYS "Wimp_LoadTemplate",,stack%,ws%,wsend%,-1,"Options",0 TO ,,ws%
 1380 SYS "Wimp_CreateWindow",,stack% TO options%
 1390 REM ****** load and create Save box ******
 1400 SYS "Wimp_LoadTemplate",,stack%,ws%,wsend%,-1,"xfer_send",0 TO ,,ws%
 1410 savestr%=!(stack%+88+32*2+20)
 1420 SYS "Wimp_CreateWindow",,stack% TO saveas%
 1430 REM ****** end of window creation ******
 1440 SYS "Wimp_CloseTemplate"
 1450 ENDPROC
 1460 :
Icon 2 in the Save box is the writable one, with indirected data. It may not have any text, but it does have 256 bytes allocated to it, or whatever figure you decided on when you modified the template, so the Wimp will allocate this number of bytes in the indirected data workspace as a buffer. After loading the template into the data block, the Wimp sets up this buffer, at the current value of ws%. It then updates the part of the window data that deals with icon 2, putting the address of the buffer into it.
Finding the Writable Icon Text
We would like to be able to read from and write to this buffer, so we need to know this address. If you check back to Section 6, where we introduced icons and indirected data, you will see that the address is contained in the word at byte 20 of the icon data block.Line 1410 sorts out the maths of calculating the address of byte 20 of the third 32-byte block, coming after 88 bytes of window data, with b% as its start! It gets the four-byte number and puts it into variable savestr%. Thus savestr% contains the address of any text in the writable icon.
Having safely obtained this information, we go ahead and create the window, in line 1420. We could instead have obtained the same information with a call to Wimp_GetIconState, but this way only took one line.
We have two more lines to add to PROCmenus:
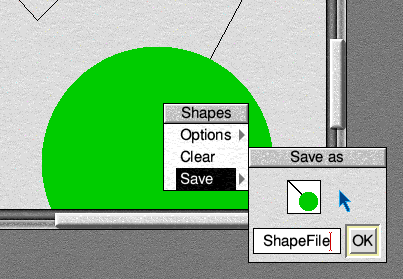
 1910 DEFPROCmenus
 1920 REM create menus and attach submenus and dialogue boxes
 1930 PROCmain_menu
 1940 PROCattach(mainmenu%,0,info%)
 1950 PROCwindow_menu
 1960 PROCattach(wmenu%,0,options%)
 1970 PROCattach(wmenu%,2,saveas%)
 1980 $savestr%="ShapeFile"
 1990 ENDPROC
 2000 :
Line 1970 attaches the Save box to the window menu, and line 1980 puts a default filename into the Save box's writable icon.
You will now find that the Save menu item will lead you to the Save box. You can play with it at this point (find the listing as page_152); the 'OK' icon animates and you can type into its writable icon - fun, but not much use!
You may have noticed when using commercial software that, once you have loaded a file, the writable icon in the Save box usually contains the full pathname of the last file that was loaded or saved.
As we get the full pathname in PROCload, we may as well put it into the writable icon buffer, while we have the chance, so now add an extra line to PROCload:
 3630 DEFPROCload
 3640 IF b%!40<>&012 ERROR 1<<30,"Filetype not recognised"
 3650 PROCterm(b%+44)
 3660 SYS "XOS_CLI","LOAD "+$(b%+44)+" "+STR$~list% TO err%;flags%
 3670 IF (flags% AND 1)<>0 !err%=1<<30:SYS "OS_GenerateError",err%
 3680 b%!12=b%!8
 3690 b%!16=4:REM Message_DataLoadAck
 3700 SYS "Wimp_SendMessage",17,b%,b%!4
 3710 $savestr%=$(b%+44)
 3720 !b%=main%
 3730 SYS "Wimp_GetWindowState",,b%
      etc.
If you open the Save box without first loading in a file, its writable icon will read 'ShapeFile', but, if you load in a file, its contents will change to the full pathname of the file. You will recall that the pathname is in the message data block, starting at byte 44. Line 3710 copies it into the buffer at savestr%.
Now we need to be able to drag the icon from our Save box to a directory viewer, as part of the save procedure.
You will remember that, when we edited the Save box template, we made sure that the icon that contained our sprite had a 'Click/Drag' button type.
When we click a mouse button over this icon, our application first gets a call from Wimp_Poll with a reason code of 6, leading us to the well-worn PROCmouseclick. If we continue to hold down the button, though, we get a second call with the same reason code, but this time the number that indicates the state of the mouse buttons is multiplied by 16. This indicates the start of a drag operation.
Let's add just one more line to PROCmouseclick:
  420 DEFPROCmouseclick
  430 REM handles mouse clicks in response to Wimp_Poll reason code 6
  440 REM b%!0=mousex,b%!4=mousey:b%!8=buttons:
          b%!12=window handle (-2 for icon bar):b%!16=icon handle
  450 CASE b%!12 OF
  460   WHEN -2:CASE b%!8 OF
  470     WHEN 2:PROCshowmenu(mainmenu%,!b%-64,96+2*44):
                 REM replace '2' with number of main menu items
  480     WHEN 4:!b%=main%:SYS "Wimp_GetWindowState",,b%:
                 b%!28=-1:SYS "Wimp_OpenWindow",,b%
  490   ENDCASE
  500   WHEN main%:PROCwindow_click
  510   WHEN options%:PROCopt_box(b%!8,b%!16)
  520   WHEN saveas%:PROCsavebox
  530 ENDCASE
  540 ENDPROC
  550 :
We'll shunt all the decoding involved with this window across to PROCsavebox. First, delete the old PROCsave, then add the new routine:
 3890 DEFPROCsavebox
 3900 CASE b%!16 OF
 3910   WHEN 1:IF b%!8=16 OR b%!8=64 THEN PROCdrag(b%!12,1)
 3920 ENDCASE
 3930 ENDPROC
 3940 :
Now might be a good time to look through the listing so far and make sure that you understand how it works; find the listing as page_154.
The Difference Between Click and Drag
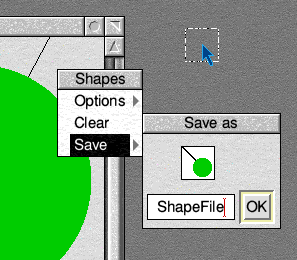
Try running the application again and opening the Save box. If you give a quick click on the sprite icon, nothing will happen, but if you hold down Select or Adjust for more than about half a second, you will get an error message: 'No such function/procedure at line 3910'.The CASE ... OF structure checks the icon handle. If we have clicked a button on icon 1, the one we wish to drag, line 3910 checks the state of the buttons.
As soon as you click a button over this icon, we come to this line, via PROCmouseclick. If Adjust or Select was clicked, the number it checks is 1 or 4, both of which are ignored by the IF ... THEN statement.
If the button is held down for more than a fraction of a second, we get a second call, this time with the button state number multiplied by 16; Adjust produces 16 and Select produces 64, both of which result in a call to the non-existent PROCdrag.
This indicates the start of our drag operation, so we have to construct a drag box. The Wimp_DragBox command uses a data block with 56 bytes! Fortunately, these are in groups of four and, even more fortunately, we do not need to bother with a lot of them.
There are also 11 different types of drag, but we need only concern ourselves with one of them, type 5. The others are all listed in the Programmer's Reference Manual.
Creating a Drag Box
We will not look at the complete data block, just the essentials. The word at byte 4 contains the drag type. Type 5 means that we are dragging a fixed size box, made of rotating dashes.The next four words, starting at byte 8, contain the minimum and maximum x and y coordinates of the drag box before we start to move it - you should be familiar with the usual order of these things, by now.
The following four words, from byte 24 onwards, contain the coordinates of the area in which you can drag the box. All these are screen, not window, coordinates. Note that the maximum x and y values should be calculated from the size of the current screen mode, so as to confine the drag-box and pointer to the visible screen area, but for simplicity we will just use some large values.
Now to PROCdrag, where we enter all this information:
 3950 DEFPROCdrag(window%,icon%)
 3960 LOCAL c%
 3970 c%=FNstack(56)
 3980 PROCget_origin(window%,xorig%,yorig%)
 3990 !c%=window%:c%!4=icon%
 4000 SYS "Wimp_GetIconState",,c%
 4010 xmin%=xorig%+c%!8:ymin%=yorig%+c%!12:xmax%=xorig%+c%!16:ymax%=yorig%+c%!20
 4020 c%!4=5:REM drag type
 4030 c%!8=xmin%:REM coordinates of drag box
 4040 c%!12=ymin%
 4050 c%!16=xmax%
 4060 c%!20=ymax%
 4070 c%!24=0:REM screen min x
 4080 c%!28=0:REM screen min y
 4090 c%!32=4096:REM screen max x
 4100 c%!36=3072:REM screen max y
 4110 SYS "Wimp_DragBox",,c%
 4120 PROCunstack(c%)
 4130 ENDPROC
 4140 :
We're passing the window and icon handles where our drag starts to this procedure so that we will be able to use it in a more general way, in our Wimp shell program. For the same reason, we're using stack memory and c%.
The listing at its current stage is supplied as page_156.
Matching the Drag Box to the Icon
It would look best if the drag box had the same size and initial position as the icon we are dragging from. To achieve this, we need to get the screen coordinates of the bounding box of the icon, which, in turn, means we have to start with the coordinates of the window origin. Line 3980 deals with this, with a call to PROCget_origin.Having found the coordinates of the window origin, we can now get the window coordinates of the icon with lines 3990 and 4000, and convert these to screen coordinates in line 4010.
We now make up the contents of the data block for Wimp_DragBox, starting with the drag type in c%+4. The next four words, in lines 4030 to 4060, are the coordinates of the box, which we obtained in line 4010, and the following four define the area where we can drag it. We naturally want this to be anywhere on the screen, but preferably not off it, so we enter appropriate minimum and maximum screen coordinates in lines 4070 to 4100.
We do not have to enter anything in the remainder of the 56-byte data block, as the rest of the block is not used by drag type 5.
We are now ready to call Wimp_DragBox, and then return to Wimp_Poll to await further developments. The drag box will appear, and will remain on the screen until you release the mouse button. Try it.
You can now drag a box from your Save icon to anywhere on the screen, but nothing happens when you release the button. What should happen is the subject of the following section.
The figures in lines 4090 and 4100 are the maximum values supported by current RISC OS hardware (at the time of writing the second edition of this guide): the IYONIX pc running RISC OS 5 can display screen modes of up to 2048 × 1536 pixels, which equates to 4096 × 3072 OS units. If, as is likely, you are using a smaller screen mode than this, you will find that you can drag both the drag-box and the pointer itself off the screen beyond the top and right edges, which is not desirable. The box should be confined to the screen area, just as it is at the bottom and left edges.
Ideally, your program should work independently of screen mode so that the figures in c%+32 and c%+36 depend on the current mode. There are two system calls, OS_ReadVduVariables and OS_ReadModeVariable, documented in the Programmer's Reference Manual, both of which read the current screen size in pixels and number of OS units per pixel, which can be used to find these values. If you have your own copy of the PRM, it would be a good idea to look them up and find out how to supply the correct values to PROCdrag. Because using these calls adds complexity to the procedure for little practical gain, though, we will leave the current constants in our listing for now.