
|
www.riscos.com Technical Support: |
The PRINT statement provides a number of ways of formatting the printed output.
The items in a PRINT statement can be separated by a variety of different punctuation characters. Each of these characters affects the way in which the text is formatted:
The following program demonstrates this:
10 PRINT "Hello " "Hello ","Hello"'"What's all this?"
Typing RUN produces the following output:
Hello Hello         Hello
What's all this?
Numbers are printed right justified in the print field, unless preceded by a semicolon, which causes them to be left justified. Print fields are discussed below. In the example below, the first number is right justified in the default field of ten characters; the second number is left justified because a semicolon comes before it:
10 A% = 4
20 PRINT 4;" ";A%
Typing RUN produces (spaces are shown as .):
.........4.4
Numbers are normally printed (displayed) as decimal values unless they are preceded by a ~, in which case they are given in hexadecimal notation (hexadecimal numbers are discussed in the Bases chapter):
10 PRINT 10
20 PRINT &10
30 PRINT ~10
40 PRINT ~&10
produces:
........10
........16
.........A
........10
The columns controlled by commas are called fields. By default a field is ten characters wide. Each string which is printed following a comma starts at the lefthand side of the next field. In other words, using commas is a convenient method of left-justifying text. Numbers, on the other hand, are displayed to the right of the next field, so that the units of integers, or the least significant decimal places of floating point numbers, line up.
Thus,
10 FOR N% = 1 TO 5
20 A$ = LEFT$("Hello",N%)
30 B% = N%*10^(N%-1)
40 PRINT A$,A$,A$,A$'B%,B%,B%,B%
50 NEXT N%
produces the following when RUN:
H         H         H         H
         1         1         1         1
He        He        He        He
        20        20        20        20
Hel       Hel       Hel       Hel
       300       300       300       300
Hell      Hell      Hell      Hell
      4000      4000      4000      4000
Hello     Hello     Hello     Hello
     50000     50000     50000     50000
Problems may occur when you print out floating point numbers. For example:
PRINT 6,9,7/3,57
produces:
6 92.33333333 57
The nine and the decimal equivalent of 7/3 run into each other.
To prevent this, you can alter the default values for the field width or the number of decimal places printed (or both) by using the integer variable @%. The way in which you alter the value of @% depends on which version of the BASIC interpreter you are using, as follows:
To see the effect of altering the value of @%, type:
@%="F8.4"
then
PRINT 6,9,7/3,57
and the following is produced:
6.0000 9.0000 2.3333 57.0000
The value you supply for @% can take one of three forms:
For more information on using @%, see the section on the PRINT command, in the Keywords chapter.
To obtain the same format in the 1.04 and the 1.05 interpreter example, type:
@% = &20408
The assignment of the variable @% is made up of a number of parts:
The format: the first figure after the & symbol, can take three values:
See Keywords chapter for more details on @%.
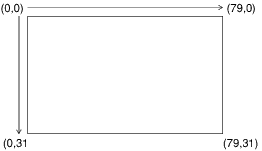
When text is entered at the keyboard or displayed using the PRINT statement, the position at which it appears on the screen depends on the location of the text cursor. As each character is printed, this cursor moves on to the next character position.
Initially, the text cursor is at the top lefthand corner of the screen, which is position (0,0). The number of possible positions for the cursor depends on the screen mode. For example, in screen mode 12 which has 80 characters across the screen and 32 rows, the coordinates it can have vary as follows:
You can use TAB with one parameter to control the position of the text cursor. For example:
PRINT TAB(x)"Hello"
It works as follows. If the current value of COUNT (which holds the number of characters printed since the last newline) is greater than the required tab column (i.e. x above), a newline is printed. This moves the cursor to the start of the next line, and resets COUNT to zero. Then x spaces are printed, moving the cursor to the required column.
Note that it is possible to tab to column 60 in a 40 column mode; the cursor will simply move to column 20 of the line below the current one. Using TAB with one parameter to position the cursor on the line will also work, for example, when characters are sent to the printer, as it is just printing spaces to achieve the desired tabulation.
On the other hand, TAB with two arguments works in a completely different way: it uses the operating system to position the cursor at a specified position on the screen - this is relative to the screen 'home' position, which is normally the top left. In this case, if you try to position the cursor on, say, column 60 in a 40 column mode, the command will be ignored. Furthermore, this kind of tabbing does not affect any characters being sent to the printer.
In addition to TAB, there are other methods of altering the position of the cursor. If, for example, you type
10 PRINT "A";
20 VDU 8
30 PRINT "B"
PRINT "A"; prints an A at the current cursor position and moves the cursor one place to the right. VDU 8 moves the cursor back one position so that it is underneath the A. Hence, PRINT "B" prints a B at the same position as the A, and so rubs it out.
VDU 8 moves the cursor back one space.
VDU 9 moves the cursor forward one space.
VDU 10 moves the cursor down one line.
VDU 11 moves the cursor up one line.
VDU 12 clears the screen and puts the cursor at the top left.
VDU 13 moves the cursor to the beginning of the line.
VDU 30 moves the cursor to the 'home' position.
For details of these and other effects available with VDU see the chapter entitled VDU Control.
Each character is made up of a pattern of dots on an eight by eight grid. All normal letters, numbers and so on are pre-defined in this way. It is possible, however, to define your own characters with ASCII values in the range 32 to 255.
To do this, use the VDU 23 command, followed by the code of the character you wish to define and then eight integers, each representing one row of the character, from top to bottom. The bit pattern of each integer defines the sequence of dots and spaces: one gives a dot and zero gives a space.
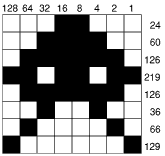
To set up character 128 to be the shape shown above, use the following:
VDU 23,128,24,60,126,219,126,36,66,129
Then, to display this character, type
PRINT CHR$(128)